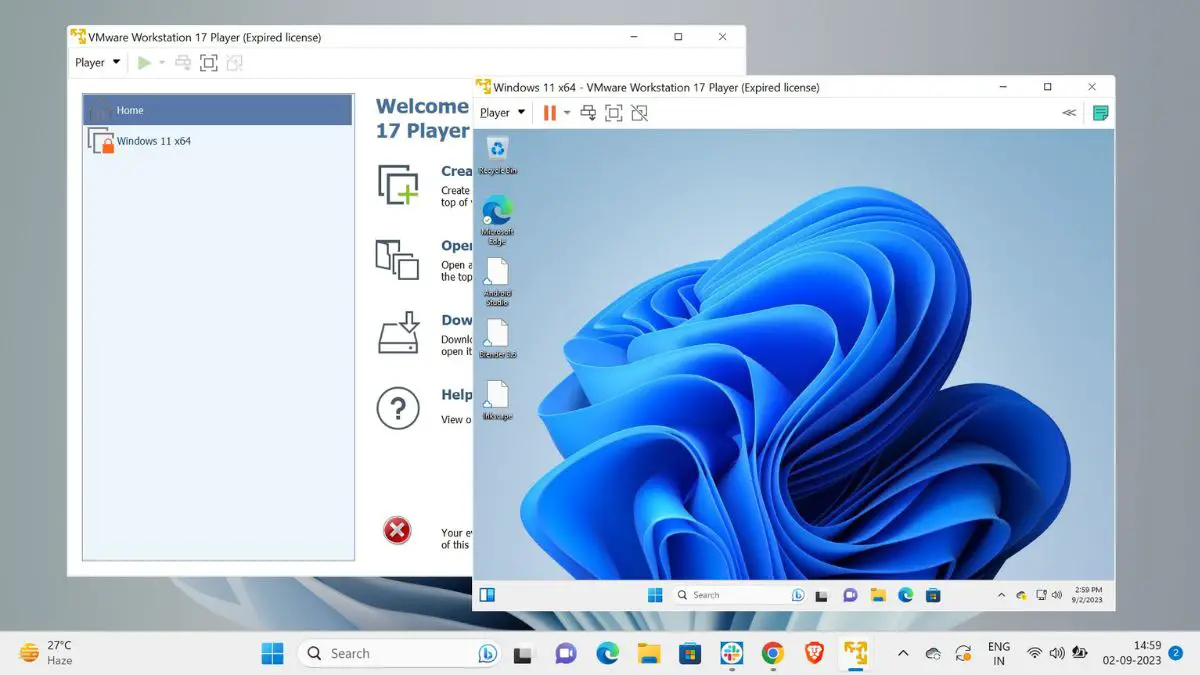
Windows 11, the latest operating system from Microsoft, has generated excitement with its sleek design, improved performance, and new features. If you’re eager to explore Windows 11 but don’t want to install it directly on your physical machine, VMware Workstation Player offers a valuable solution. By using it, you can install Windows 11 in VMware Workstation Player.
VMware Workstation Player is virtualization software that allows you to create virtual machines on your computer, enabling you to run multiple operating systems simultaneously. VMware Workstation Player provides a user-friendly and reliable platform for virtualization, making it an ideal choice for users. It offers a range of features, including the ability to install and run various operating systems, network configuration options, and seamless integration with your host operating system.
Prerequisites
Before you begin the installation process, make sure you have the following prerequisites:
- Installed VMware Workstation Player: Ensure that you have VMware Workstation Player installed on your computer. You can download it from the VMware website and install VMware Workstation Player on Windows 11.
- Windows 11 ISO file: Obtain a copy of the Windows 11 ISO file. You can download the ISO file from the official Microsoft website or through other reliable sources.
- Sufficient System Resources: Also, make sure your computer meets the system requirements to run VMware Workstation Player and Windows 11 smoothly. Check the VMware and Microsoft websites for the minimum system requirements. It is suggested to have at least 64 GB of storage and at least 8 GB of RAM.
How to Install Windows 11 in VMware Workstation Player
In this section, we will walk you through the process of installing Windows 11 in VMware Workstation Player, enabling you to explore the new operating system in a virtual environment.
For that, follow these step-by-step instructions to install Windows 11 in VMware Workstation Player:
1. Creating Windows 11 Virtual Machine
First, we need to create a virtual machine in VMware Workstation Player to install Windows 11. Here are the steps:
1. Launch VMware Workstation Player.
2. Click on Create a New Virtual Machine to start the virtual machine creation wizard.

3. Under Installer disc image file (ISO), click on Browse and locate, then select the Windows 11 ISO file. Once it’s selected, click Next.

4. Now it’s time to provide a name for your virtual machine, give it a name, and choose a location to save it.
5. After that, click Next to continue.

6. VMware Workstation Player will detect that Windows 11 requires an encrypted Trusted Platform Module (TPM). You will be prompted to configure a password for the virtual machine. Choose your preferred encryption option and enter a password.

7. Choose the disk capacity for the virtual machine. It is suggested to provide at least 64 GB of storage for the smooth operation of Windows 11.
8. Then click on Next to continue.

9. On the next screen, you will be displayed that your Virtual Machine is ready to launch. But, we suggest first clicking on Customize Hardware and changing some settings before finalizing the installation steps.

10. The first change we are going to make is to increase memory. From the left pane click on Memory and move to the slider to increase and decrease memory allocation to the Virtual Machine. It is advised to at least select 4GB of memory for better performance.

11. Once we have provided enough memory, now is time to increase some processing power for our Virtual Machine. From the left sidebar click on Processors and increase or decrease the Number of processor cores. Make sure you know how powerful your CPU is before allotting cores.
12. Once done selecting, click on the Close button.

13. After that, you can click on Finish to create the virtual machine.
Note
You may also check the Power on this virtual machine after creation as doing this will automatically turn on the Virtual Machine once it is installed.

14. Wait for some time as VMware Workstation prepares your Windows 11 Virtual machine.

2. Installing Windows 11
Now that we have successfully created our Windows 11 Virtual Machine, it’s time to set it up. The process remains almost the same as what we do while installing Windows on our PC.
1. Launch VMware Workstation.
2. You will have a Windows 11 Virtual Machine created here; select it and click on Play Virtual Machine to power it on.

3. If you get an error like this, Be patient and press any key on your keyboard.
Note
You need to first hover your mouse cursor inside the Virtual Machine display area. To bring the cursor back out of the Virtual Machine, press Ctrl + Alt together.

4. After that, you will enter in Windows Setup mode. On the first screen, you will be prompted to choose Language, Time and currency format, and input or keyboard method. Choose carefully as per requirements and click on Next.

5. Once done! Click on Install Now to begin Windows 11 installation.
6. Select I don’t have a product key if you don’t have one and click Next. However, if you have a Product key, enter it here to activate Windows.

7. Based on your work requirements you can select what type of Windows you want to install. For this installation, we are selecting Windows 11 Pro.
8. Click Next when selected.

9. On the next step, you will be presented with Terms and Conditions. Go through them carefully, accept them, and click Next.

10. Select the type of installation you want. It is preferred to select the Custom option.

11. On the next step, select the installation location for your Windows 11 OS and click Next to continue.

12. Now wait patiently while Windows is being installed as a Virtual Machine. It may take some time depending on your system configuration.

3. Setup Windows 11 on VMware
Once Windows is installed, you will be prompted to customize some features, starting from your country or region.
Here is how to setup Windows 11 on VMware:
1. From the list select your country or region and click Yes.

2. After that, you can select your preferred keyboard layout or input method. Again click Yes after selecting your choice of layout.

3. Now again wait for some moments, Windows will now check for any latest update.

4. After checking for updates, you can now name your device. Click Next if you’ve entered any name or simply select Skip for now.

5. Moreover, Windows offers you the flexibility to choose how you want to use your computer. You can choose Set up for personal use if you are using it for your personal activities or simply as your personal computer. In case you are using your PC for professional use you can select Set up for work or school.
6. Click Next once selected.

7. Whatever option you use, you will be asked to sign in with a Microsoft account before moving to the next step. Click on Sign in and you will be taken to the Microsoft login page, enter your login credentials or create a new account if you are a new user.

8. If you are an old user, Windows will detect your profile and welcome you with the following welcome screen. Here, you can choose to restore from any previous OneDrive backup or fresh start. Or, click on View more options to see multiple restore options.

9. From this screen you can select from any last restore point and Windows will restore all the apps, settings, and files backed up at that time.
10. Additionally, you can choose to Set up as a new device to begin fresh and click Next to continue.

11. After that, click on Create PIN to move into PIN settings.

12. On this screen you can choose any PIN of your choice, you will have to type it twice to verify the PIN. Set a strong PIN and remember it, click OK once done.
13. However, if you want to add letters or symbols apart from numerical, check the box corresponding to Include letters and symbols. After that, you can use combinations of letters, numerals, and symbols as your Windows PIN.

14. After setting up your PIN, you will get some promotional options from Microsoft like OneDrive and Xbox monthly subscriptions. It’s totally optional to opt for them.
15. The last screen setup screen will be for privacy settings for your device. Go through each of them carefully and click Accept once you are sure what to select.

16. Congratulations, now you have finally installed Windows 11 as a virtual machine successfully.

Conclusion
In conclusion, VMware Workstation Player allows you to explore and experience the operating system without making any changes to your main PC. By following the step-by-step instructions provided in this guide, you can easily set up a virtual machine and install Windows 11 in a few simple steps.
Enjoy exploring the new features and improvements of the latest Windows in a safe and isolated virtual environment. If you are still facing any trouble or stuck on any step, feel free to reach us through comments. We will be more than happy to help you.


