Creating a bootable USB drive is a major step when installing a new Windows operating system, and with Rufus, this process becomes fairly simple. In this article, we will guide you through the process of creating a Windows 11 bootable USB drive using Rufus. We will provide step-by-step instructions, highlighting the key settings and options you need to select in Rufus to ensure a successful installation.
Whether you are a beginner or an experienced user, this guide will equip you with the knowledge and confidence to create a bootable USB drive. By following our instructions, you will be able to seamlessly install Windows 11 on your computer and enjoy its new features and improvements. So, let’s dive in and get started on creating a bootable USB drive with Rufus.
Prerequisites
Before we begin, make sure you have the following prerequisites:
- Windows 11 ISO File: You will need a Windows 11 ISO file, which is a disk image of the operating system. You can download the Windows 11 ISO file from the official Microsoft website or other reliable sources.
- USB drive: Prepare a USB drive with at least 8GB of storage space. Ensure that it is empty or does not contain any important data, as the process will erase all existing data on the drive.
- Rufus: Download and install Rufus, a free and lightweight tool for creating bootable USB drives. Rufus is compatible with Windows operating systems and can be downloaded from the official website.
How to Download Windows 11 ISO
To create a bootable USB drive with Windows 11, you first need to download the Windows 11 ISO file. Follow these steps:
1. Visit the official Microsoft website or any other trusted source that offers the Windows 11 ISO file.
2. Locate the download link for the Windows 11 ISO file.
3. After that, choose the desired edition of Windows 11 from the drop-down menu. And then click on the Download Now button.

4. The next option is to choose the language in which you want your Windows 11 to run. Select the languages from the drop-down menu and click on the Confirm button.

5. This will create a download link. Click on the 64-bit Download button to start the download process.

6. Wait for the ISO file to finish downloading. The download time may vary depending on your internet speed.
How to Download and Install Rufus
Once you have the Windows 11 ISO file, you need to download and install Rufus. We are going to use Rufus to create a Windows 11 bootable USB drive.
To download and install Rufus, follow these steps:
1. Open your preferred web browser and visit the official Rufus website at rufus.ie.
2. On the Rufus website, navigate to the Download section. Here, you’ll get different download options for different Windows versions.
3. After that, click on the download link that corresponds to your Windows version to start the download.

4. Once the download is complete, locate the downloaded file and double-click on it to launch the Rufus.
5. A User Account Control prompt will pop up. Here, click on the Yes button.
6. Next, accept the Rufus Update Policy by clicking Yes.
Note
Rufus doesn’t need any installation, it is ready to run once downloaded.
How to Create Windows 11 Bootable USB Drive with Rufus
Now that you have both the Windows 11 ISO file and Rufus installed on your system, you can proceed to create the bootable USB drive. Before we begin, connect the USB drive to your computer. Ensure that it is properly recognized and accessible.
After that, follow the steps mentioned below:
1. Launch Rufus by double-clicking on its desktop icon or searching for it in the Start menu.
2. Under the Device menu select your USB drive from the dropdown menu. Make sure you choose the correct drive, as the process will erase all data on the selected drive.

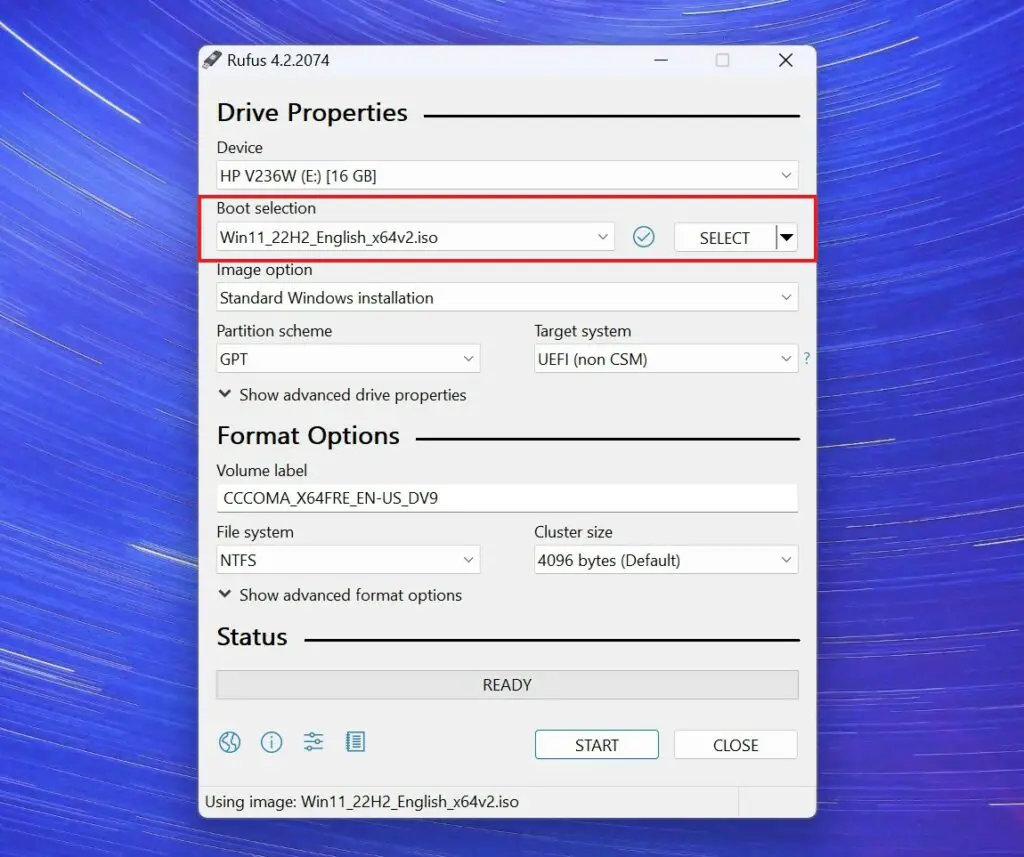
3. Under Boot Selection, click on the Select button and navigate to the location where you saved the Windows 11 ISO file.
4. Now, select the ISO file and click Open.

5. In the Rufus window, you will see several options. Leave the default settings for most of them, but make the following changes:
- Image Option: Select Standard Windows Installation.
- Partition scheme: Select GPT.
- Target System: Under Target System, choose UEFI (non-CSM).
- File system: By default, Rufus uses NTFS. Leave it to default.
- Cluster size: Leave this at the default value.
6. Once you have made the necessary changes, double-check that all the settings are correct.
7. Click on the Start button to begin the process.

8. A Windows User Experience screen will appear with multiple options. Here you have to carefully check the options as per your requirements.
9. Then click OK to proceed with the creation of the bootable USB drive.

10. Rufus will display a warning that all data on the USB drive will be destroyed. Make sure you have backed up any important data.
11. After that, click on OK to proceed.

12. Rufus will now format the USB drive and copy the Windows 11 ISO files to it. The process may take several minutes, depending on the speed of your system and the USB drive.

13. Once Rufus completes the process, you will see a message READY indicating that the bootable USB drive has been created successfully.
14. Safely eject the USB drive from your computer.

Conclusion
You have successfully created a bootable Windows 11 USB drive using Rufus. Now, you can use the USB drive to install the Windows 11 operating system on any PC and enjoy its new features and enhancements.
If you are facing any trouble with any of the steps above, feel free to comment. However, if you find it difficult to create a USB drive using Rufus, then you can check out our guide on how to create Windows 11 bootable USB using Etcher.


