There are situations when you may need to check the build and version of Windows 11. For instance, if an error is specific to your Windows 11 specifications, you can use this information to find a solution or determine compatibility with certain applications. Additionally, knowing your version and build is important for troubleshooting, ensuring that your system is up-to-date, or verifying features only available in specific updates.
In this guide, we will discuss a few methods to check the build and version number of your Windows 11 system. You can also read our detailed guide on how to verify whether your Windows 11 is genuine.
How to Check Build and Version of Windows 11
If you want to check the build and version installed on your computer, Windows 11 provides different options to find them, using the Settings app, About Windows (winver), and PowerShell.
Let us discuss them one by one. So, follow the guide till the end.
1. Check Using the Settings app
The simplest method to check the build and version of Windows 11 installed on your computer is by using the Settings app. This method is quick, user-friendly, and doesn’t require any advanced knowledge.
To do so, follow these steps:
1. Click on the Windows icon to open the Start Menu, then click on the Settings icon to open Windows Settings. Alternatively, you can press the Win + I keyboard shortcut to open it directly.

2. In the Settings window, click on the System tab in the left panel.
3. After that, look for the About option and click on it.

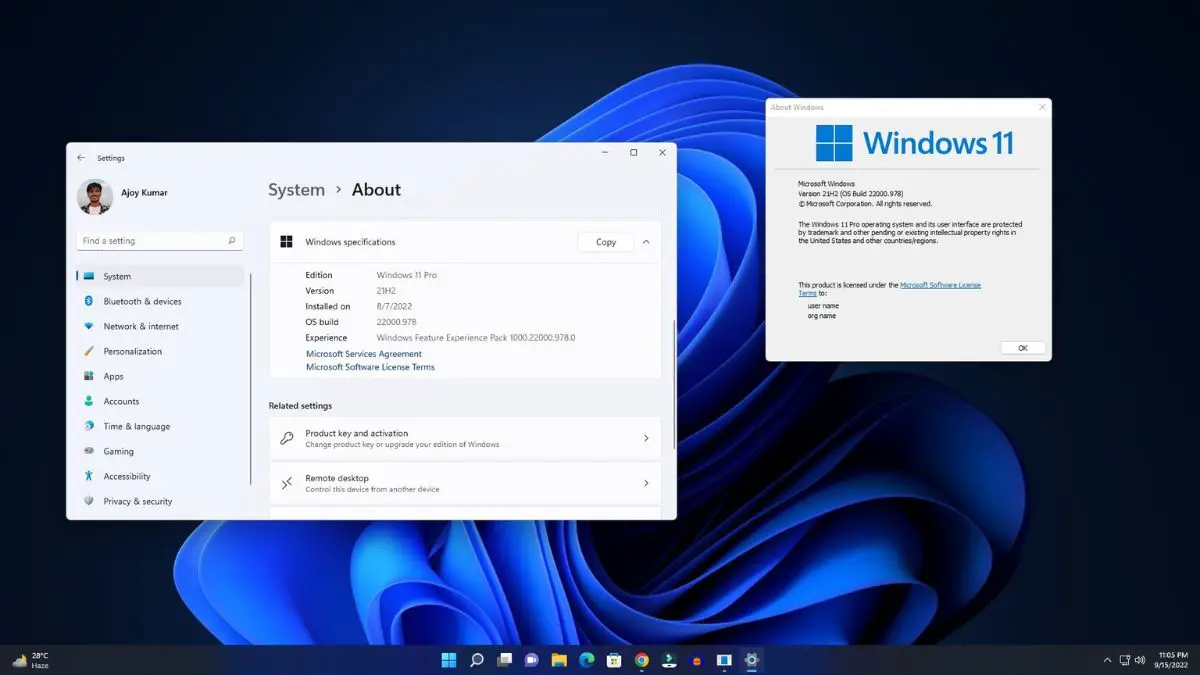
4. It will display all the system specifications, look for the Windows Specifications section to find the OS build and version of Windows 11.

This is how you can check the operating system build and version of Windows 11 that you are using on your system. Along with this information, in the About section, you can also find details about when you installed the OS on your system and the Windows feature experience pack information.
Using this information, you can verify whether you are using the latest version of Windows or not. If you are not, you can check for updates. Additionally, this information will help you troubleshoot your system and find compatible software for your device.
2. Check using winver
You can also check the build and version of your Windows 11 operating system using the winver command. This command offers information regarding the version of the Windows operating system you are running, including the build number and any installed service packs.
Here’s how you can use it to find the information:
1. Click the Start button and search for winver.
2. Press [Enter] to check your build and version of Windows 11.

3. It will open the About Window pop-up. Here you will find all the information about your Windows 11.

Note
You can also use the Win + R keyboard shortcut, type the winver command, and click the OK button to view the build and version.
3. Check using PowerShell
Now, if you are an advanced user and want to use PowerShell, you can find the build and version of Windows 11 by using PowerShell (or Terminal in newer versions). To do this, follow these steps:
1. Click the Start button and search for the PowerShell app.
2. Click the top result to open the PowerShell console.

3. Now, type the following command and press [Enter] to view the build and version of Windows 11
Get-ComputerInfo | Select OsName, OSDisplayVersion, OsBuildNumber
4. Once you complete the steps, you’ll get the version and build number of Windows 11.

Using any of these methods, you can quickly determine your Windows 11 version and build number, which will help you troubleshoot issues or confirm compatibility with software or features.


